LINK DEL VIDEO...
sábado, 14 de noviembre de 2020
INSTALACION DE POSTGRES
1.- iremos al link a descargar postgres versión 13 o de su preferencia
https://www.enterprisedb.com/downloads/postgres-postgresql-downloads

2.- instalación de postgres
Abrimos la descarga y nos parece una ventana así al cual le
daremos siguiente.

3.- Seleccionamos los componentes

4.-SELECCIONAREMOS LA CONTRASEÑA

5.-PUERTO DE POSTGRESS
Puedes dejar el puerto por default o seleccionar un nuevo
puerto que este desocupado.
En mi caso como ya lo tenia instalado les mostrare de uno
diferente y después mi puerto.
clic siguiente


6.-INSTALACION Y/O
CONFIGURACION DE Stack Builder
Daremos siguiente
hasta instalar, hasta que se instalen todos los componentes solo daremos a
siguiente.
Ya que llegamos al componente Stack Builder , eligiremos las opciones que están en esta captura son necesarios para la
conexión sea correctamente .

7.- INSTALACION DE CADA
APLICACIÓN DE STACK BUILDER
Nos dará varias ventanas en el cual tendrá que aceptar para
que se instalen las opciones ya seleccionada.

Ø Después
de haberse instalado le daremos Next y nos aparecerá otra ventana para instalar
el complemento de Postgres


Este es
el Directorio en que se instalara pueden cambiar la dirección y daremos todo siguiente

9.- TERMINACION DE INSTALACION DE COMPLEMENTOS
Le daremos en
siguiente y se empezara a instalar cada complemento, a cada ventana le daremos next hasta que se finalice la instalación

10.-
INSTALACION FINALIZADA


Por ahí se ve que ya he creado una base de datos con postgres y he
trabajado con ella así aparecería en mi caso esta en idioma español

LINK DUDADAS:
Para dudas favor de consultar el siguiente link:
PROYECTO 2 UNIVERSIDAD (DJANGO-PYTHON)
1.- empezamos nuestro proyecyo boorrando la raiz y empezando a a crear nuestro Proyecto Universidad y para correr o empezar a crear nuestra app que se llamara GestionAcademica necesitamos irnos a nuestro proyecto ya creado Universidad y dir para confirma dicha ejecucion
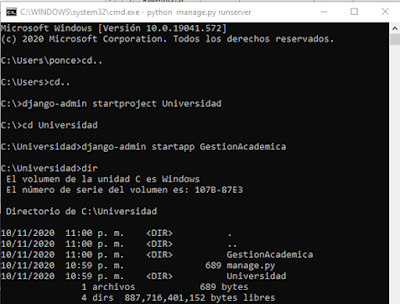
2.- corremos nuestro servidor para comprobar que la ejecución fue excelente y no tuvo algún error en nuestro sitio web.
abajo nos dara http(un link) el cual copiaremos y pegaremos en nuestro navegador de preferencia

3.- Listo su ejecución no tuvo falla

4.-Hacemos migraciones con migrate y makemigrations (abrimos otro CMD)

5.-No iremos a pycharm donde abriremos nuestra carpeta Universidad , y nos iremos a Model , Admin y Settings del mismo proyecto.
--------------------------------MODELS------------------------------------------------------------------------from django.db import models# Create your models here.class Alumno(models.Model):#num_cont=models.CharField(max_length=10,primary_key=True)ApellidoPaterno= models.CharField(max_length=35)ApellidoMaterno = models.CharField(max_length=35)Nombres = models.CharField(max_length=35)DNI=models.CharField(max_length=8)FechaNacimiento=models.DateField()SEXOS= (('F','Femenino'),('M','Masculino'))sexo=models.CharField(max_length=1,choices=SEXOS,default='M')#foto=models.ImageField(upload_to='photos')def NombreCompleto(self):cadena="{0} {1} {2}"return cadena.format(self.ApellidoPaterno,self.ApellidoMaterno,self.Nombres)def __str__(self):return self.NombreCompleto()class Curso(models.Model):Nombre = models.CharField(max_length=30)Estado = models.BooleanField(default=True)Creditos = models.PositiveIntegerField(default=1)def __str__(self):return "{0} -> {1}".format(self.Nombre,self.Creditos)class Matricula(models.Model):Alumno =models.ForeignKey(Alumno, null=False, blank= False, on_delete= models.CASCADE)Curso = models.ForeignKey(Curso, null=False, blank=False, on_delete=models.CASCADE)FechaMatricula=models.DateTimeField(auto_now=True)def __str__(self):cadena = "{0} inscrito en: {1}"return cadena.format(self.Alumno, self.Curso)--------------------------Admin------------------------------------------------------------------------------------------from __future__ import unicode_literalsfrom django.contrib import admin# Register your models here.from .models import Alumnofrom .models import Cursofrom .models import Matriculaadmin.site.register(Alumno)admin.site.register(Curso)admin.site.register(Matricula)---------------------------------------------------------Settings-------------------------------------------------

INSTALLED_APPS = [
'django.contrib.admin',
'django.contrib.auth',
'django.contrib.contenttypes',
'django.contrib.sessions',
'django.contrib.messages',
'django.contrib.staticfiles',
'GestionAcademica',
]
-----------------------------------------------------------------------------------------------------------------------------

7.- ya que pegamos el http que nos dan , ENTRAMOS CON NOMBRE USUARIO Y CONTRASEÑA del superuser creado
ya que entramos nos aparecerán las tablas lista para ingresar datos ...

8.- INGRESAMOS DATOS
Alumnos ya con datos ingresados

9.- INGRESAMOS DATOS
Cursos ya con datos creados

10.- INGRESAMOS DATOS
Matricula ya con datos creados

11.- ASI SE VERA LOS DATOS GUARDADOS EN NUESTRAS TABLAS

PROYECTO Alumnos2 Django (pycharm) - python
1.- Empezamos a crear el Project llamado
Alumnos2
-se
crearía una carpeta y hacemos el paso 2 entramos al proyecto cd Alumnos2 y ya
adentro crearemos una subcarpeta la cual se llamará datos_per.
Aquí abajo les dejare un ejemplo de cómo seria.

2.- abrimos la carpeta creada de Alumnos2 en pycharm , para comprobar que se creo .

3.-corrida
del sitio
volvemos al cmd donde estábamos y para asegurarnos
también podremos poner Alumnos2>dir
corremos nuestro sitio con
Python
manage.py runserver , copiamos y pegamos el http://127.0.0.1:8000/ que
nos dará al momento de correrlo

4.-pantalla del sitio

5.-Abrimo la carpeta
-desde pycharm >>Alumnos2 y CREAMOS NUEVO DATOS EN NUESTRA CARPETA EN MODELS
# -*- coding: utf-8 -*-
from __future__ import unicode_literals
from django.db import models
# Create your models here.
class Datospersonales( models.Model):
num_cont = models.CharField( max_length=10, primary_key=True )
ApellidoPaterno = models.CharField( max_length=35 )
ApellidoMaterno = models.CharField( max_length=35 )
Nombres = models.CharField( max_length=35 )
DNI = models.CharField( max_length=8 )
FechaNacimiento = models.DateField()
SEXOS = (('F', 'Femenino'), ('M', 'Masculino'))
sexo = models.CharField( max_length=1, choices=SEXOS, default='M' )
# foto=models.ImageField(upload_to='photos')
def NombreCompleto(self):
cadena = "{0} {1} {2} {3}"
return cadena.format( self.num_cont, self.ApellidoPaterno, self.ApellidoMaterno, self.Nombres )
def __str__(self):
return self.NombreCompleto()
----------------------------------------------------------------------------------------------------------------------------
6.-creacion de usuario
-para crear un usuario será Python manage.py createsuperuser
Ø Ingresaremos
nombre del usuario
Ø correo
electrónico
Ø contraseña(para la contraseña no se vera
que uno la puso pero es por seguridad usted pone su contraseña y si escribe)
Ø daremos
Y para validar los
datos ingresados para creación del usuario

7.-creacion de código en clase
admin
from __future__ import unicode_literals
from django.contrib import admin
from.models import Datospersonales
admin.site.register(Datospersonales)
----------------------------------------------------------------------------------------------------------------------------

10.-corremos el servidor de
nuevo
-con e url que nos da el servidor con el nombre de usuario y contraseña que le dimos a nuestro superuser

11.- ingresaremos datos

12.-podremos ver los datos ingresados

jueves, 29 de octubre de 2020
CUADROS DE DIALOGO
from tkinter import *
from tkinter import messagebox
def main():
messagebox.showinfo("Title", "Your message here")
messagebox.showerror("An Error", "Oops!")
messagebox.showwarning("Title", "This may not work...")
messagebox.askyesno("Title", "Do you love me?")
messagebox.askokcancel("Title", "Are you well?")
messagebox.askquestion("Title", "How are you?")
messagebox.askretrycancel("Title", "Go again?")
messagebox.askyesnocancel("Title", "Are you well?")
main()
Pantalla de salida


PROGRAMA GATO
from tkinter import *
from tkinter import messagebox
from tkinter import simpledialog #pedir informacion
from pymongo import MongoClient
import time
global nombreJugador1,nombreJugador2,fecha,hora,ganador
hora= time.strftime("%H:%M:%S")
fecha= time.strftime("%d-%m-%Y")
def bloquear():
for i in range(0,9):
listaBotones[i].config(state="disable")
def iniciar():
for i in range(0,9):
listaBotones[i].config(state="normal")
listaBotones[i].config(bg="Lightgray")
listaBotones[i].config(text="")
t[i]="N"
global nombreJugador1,nombreJugador2
nombreJugador1= simpledialog.askstring("Jugador","Escribe el nombre del jugador 1:")
nombreJugador2 = simpledialog.askstring("Jugador", "Escribe el nombre del jugador 2:")
turnoJugador.set("Turno: "+ nombreJugador1)
def cambiar(num):
global turno,nombreJugador1,nombreJugador2
if t[num]=="N" and turno==0:
listaBotones[num].config(text="X",fg="white",font=("Arial Black" , 8))
listaBotones[num].config(bg="#F781D8")
t[num] = "X"
turno = 1
turnoJugador.set("Turno: "+ nombreJugador2)
elif t[num]=="N" and turno==1:
listaBotones[num].config(text="O",fg="white",font=("Arial Black" , 8))
listaBotones[num].config(bg="#A9F5D0")
t[num] = "O"
turno = 0
turnoJugador.set("Turno: " + nombreJugador1)
verificar()
def info(ganador):
list = Listbox(ventana, width=50)
list.insert(1, " primera ronda")
list.insert(2, " Nombre Jugador 1", nombreJugador1)
list.insert(4, " Nombre Jugador 2", nombreJugador2)
list.insert(6, " Ganador de la partida", ganador)
list.place(x=160, y=370)
def Salir():
exit()
def verificar ():
hora = time.strftime("%H:%M:%S")
fecha = time.strftime("%d-%m-%Y")
ganador=""
if (t[0]=="X" and t[1]=="X" and t[2]=="X") or (t[3]=="X" and t[4]=="X" and t[5]=="X") or (t[6]=="X" and t[7]=="X" and t[8]=="X"):
bloquear()
ganador = nombreJugador1
messagebox.showinfo("Ganador", "Ganaste " + nombreJugador1)
conexion(hora, fecha, nombreJugador1, nombreJugador2, ganador)
messagebox.showinfo("guardadar ", "Otra partida??PLAY")
info(ganador)
elif (t[0]=="X" and t[3]=="X" and t[6]=="X") or (t[1]=="X" and t[4]=="X" and t[7]=="X") or (t[2]=="X" and t[5]=="X" and t[8]=="X"):
bloquear()
ganador = nombreJugador1
messagebox.showinfo("Ganador", "Ganaste " + nombreJugador1)
conexion(hora, fecha, nombreJugador1, nombreJugador2, ganador)
messagebox.showinfo("guardadar ", "Otra partida??PLAY")
info(ganador)
elif (t[0]=="X" and t[4]=="X" and t[8]=="X") or (t[2]=="X" and t[4]=="X" and t[6]=="X"):
bloquear()
ganador = nombreJugador1
messagebox.showinfo("Ganador", "Ganaste " + nombreJugador1)
conexion(hora, fecha, nombreJugador1, nombreJugador2, ganador)
messagebox.showinfo("guardadar ", "Otra partida??PLAY")
info(ganador)
elif (t[0]=="O" and t[1]=="O" and t[2]=="O") or (t[3]=="O" and t[4]=="O" and t[5]=="O") or (t[6]=="O" and t[7]=="O" and t[8]=="O"):
bloquear()
ganador = nombreJugador2
messagebox.showinfo("Ganador", "Ganaste " + nombreJugador2)
conexion(hora, fecha, nombreJugador1, nombreJugador2, ganador)
messagebox.showinfo("guardadar ", "Otra partida??PLAY")
elif (t[0]=="O" and t[3]=="O" and t[6]=="O") or (t[1]=="O" and t[4]=="O" and t[7]=="O") or (t[2]=="O" and t[5]=="O" and t[8]=="O"):
bloquear()
ganador = nombreJugador2
messagebox.showinfo("Ganador", "Ganaste " + nombreJugador2)
conexion(hora, fecha, nombreJugador1, nombreJugador2, ganador)
messagebox.showinfo(" guardadar ", "Otra partida??PLAY")
info(ganador)
elif (t[0]=="O" and t[4]=="O" and t[8]=="O") or (t[2]=="O" and t[4]=="O" and t[6]=="O"):
bloquear()
ganador = nombreJugador2
messagebox.showinfo("Ganador", "Ganaste Jugador " + nombreJugador2)
conexion(hora, fecha, nombreJugador1, nombreJugador2, ganador)
messagebox.showinfo("guardadar", "Otra partida??PLAY")
info(ganador)
return ganador
def conexion(hora,fecha,nombreJugador1,nombreJugador2,ganador ):
client = MongoClient('localhost', 27017)
db = client['TABLA_GATO'] # me conecto con la bd store
document = {"Fecha: ":fecha,"Hora:": hora,"Nombre Jugador1:":nombreJugador1 , "Nombre Jugador 2:": nombreJugador2,"Ganador:":ganador}
_id = db['Juego'].insert(document)
ventana = Tk()
ventana.title("JUEGO DEL GATO")
ventana.geometry("512x512")
imagen = PhotoImage(file="C:\PyCharm 2020.2.1\CAT.png") # llamamos a la imagen
fondo = Label(ventana, image=imagen).place(x=0, y=0) # visualizamos la imagen como fondo
ventana.iconbitmap("C:\PyCharm 2020.2.1\cat_6_icon-icons.com_53579.ico") # agregue icono
vp = Frame(ventana)
ventana.config(background="white")
list= Listbox(vp, width=10,borderwidth=2,selectborderwidth=1)
c = Listbox(ventana, width=30).place(x=160,y=370)#listbox
turno = 0;
nombreJugador1 = ""
nombreJugador2 = ""
listaBotones = []
t = [] # X O N
turnoJugador = StringVar()
ganador = StringVar()
for i in range(0,9):
t.append("N")
# hacer nuestro nueve botones
boton0 = Button(ventana, width=9, heig=3, bg="#BDBDBD", cursor="hand1",command=lambda: cambiar(0))
boton0.place(x=55, y=55)
listaBotones.append(boton0)
boton1 = Button(ventana, width=9, heig=3, bg="#A9A9F5", cursor="hand1",command=lambda: cambiar(1))
boton1.place(x=155, y=55)
listaBotones.append(boton1)
boton2 = Button(ventana, width=9, heig=3, bg="#BDBDBD", activebackground="#E6E6E6",cursor="hand1",command=lambda: cambiar(2))
boton2.place(x=255, y=55)
listaBotones.append(boton2)
boton3 = Button(ventana, width=9, heig=3, bg="#A9A9F5", activebackground="#E6E6E6", cursor="hand1",command=lambda: cambiar(3))
boton3.place(x=55, y=155)
listaBotones.append(boton3)
boton4 = Button(ventana, width=9, heig=3, bg="#BDBDBD", activebackground="#E6E6E6", cursor="hand1",command=lambda: cambiar(4))
boton4.place(x=155, y=155)
listaBotones.append(boton4)
boton5 = Button(ventana, width=9, heig=3, bg="#A9A9F5", activebackground="#E6E6E6", cursor="hand1",command=lambda: cambiar(5))
boton5.place(x=255, y=155)
listaBotones.append(boton5)
boton6 = Button(ventana, width=9, heig=3, bg="#BDBDBD", activebackground="#E6E6E6", cursor="hand1",command=lambda: cambiar(6))
boton6.place(x=55, y=255)
listaBotones.append(boton6)
boton7 = Button(ventana, width=9, heig=3, bg="#A9A9F5", activebackground="#E6E6E6", cursor="hand1",command=lambda: cambiar(7))
boton7.place(x=155, y=255)
listaBotones.append(boton7)
boton8 = Button(ventana, width=9, heig=3, bg="#BDBDBD", activebackground="#E6E6E6", cursor="hand1",command=lambda: cambiar(8))
boton8.place(x=255, y=255)
listaBotones.append(boton8)
#etiquetas
turnoe = Label(ventana, textvariable=turnoJugador).place(x=140, y=10)
hora1=Label(ventana,text=hora, bg="#F5A9F2",font=("Helvetica", 12)).place(x=55,y=350)
txthora=Label(ventana,text="HORA:", bg="#F5A9F2",font=("Helvetica", 12)).place(x=0,y=350)
fecha1=Label(ventana,text=fecha, bg="#F5A9F2",font=("Helvetica" ,12)).place(x=55,y=370)
txtFecha=Label(ventana,text="FECHA:", bg="#F5A9F2",font=("Helvetica" ,12)).place(x=0,y=370)
#Botones
iniciar = Button(ventana, bg="#04B404", fg="white", text="play", width=4, height=2, font="Arial", borderwidth=9,activebackground="#E6E6E6",
cursor="hand1", command=iniciar).place(x=350, y=37)
Salir = Button(ventana, bg="#FF0000", fg="white", text="Salir", width=4, height=2, font="Arial", borderwidth=9,activebackground="#E6E6E6",
cursor="hand1", command=Salir).place(x=350, y=155)
# Crea y posiciona las lineas con Canvas()
linea = Canvas(ventana, width=310, height=10)
linea.place(x=35, y=125)
linea.create_line(310, 0, 0, 0, width=20, fill='#80FF00')
l2 = Canvas(ventana, width=310, height=10)
l2.place(x=35, y=225)
l2.create_line(310, 0, 0, 0, width=20, fill='#80FF00')
l3 = Canvas(ventana, width=10, height=310)
l3.place(x=135, y=25)
l3.create_line(0, 310, 0, 0, width=20, fill='#80FF00')
l4 = Canvas(ventana, width=10, height=310)
l4.place(x=235, y=25)
l4.create_line(0, 310, 0, 0, width=20, fill='#80FF00')
bloquear()
ventana.mainloop()
-----------------------------------------------------------------------------------------------------------------------------
PANTALLA DE EJECUCION

Suscribirse a:
Comentarios (Atom)